Repair module for Jadid Khata POS helps with complete repair service management of electronic goods like Cellphones, Computers, Desktops, Tablets, Television, Watch, Wireless devices, Printers, Electronic instruments, and many more similar devices which you can imagine!
Repair job sheet and assign it to the technician.
Configurable repair status with color code for easy identification
Manage Devices (like Mobile, Computer, Tablets, etc)
Manage Device models
Configurable checklist for device models
– Add products (spare parts) & services as per device models.
– Assign repair to a technician (service staff)
– Manage repair with a due date, completed on, status, brands, device, device models, serial number, repair checklist, defect,
– Many more features releasing in every update …
To accept the device for repair from a customer, a job sheet is created. A job sheet contains all information related to a particular repair job.
Job Sheet is a page of instruction to help the technician in performing the repair.
To add a new job sheet:
Select Business Location, customer
Service type: carry-in, pickup, or on-site. With pickup or onsite, the address has to be entered
Select Brand, Device, Device Model, based on this a pre-repair checklist will be shown.
Enter the serial number or IMEI, Password/Pattern Lock
Product Configuration, Reported problem, condition of the product can be selected or new can be entered. You can pre-define some of this for selection as described in the next section.
Similarly, you can select other fields.
Assign Operator/Technician: Operator & Technician are service staff. To Create service staff in add/edit role give the Service staff permission.
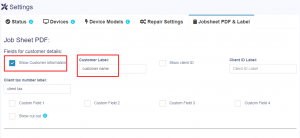
To display customer details in the job sheet, you need to enable it in Job Sheet > Settings > Jobsheet PDF & Label.
Enable the ‘Show Customer information‘ check box and add the customer name label next to it.
Scroll down and select the particular customer information to be displayed, like customer name, address etc.
Update and save the changes. Whenever a new job sheet is created the customer details will be displayed.

Job sheet labels can be printed.
Go to List Job Sheets > View > Print Label
For sending notifications for job sheets, enable the required notification type while creating/editing a job sheet.
Also, make sure to add the template for notification in the repair settings -> Status. [if the template is blank, notification is not sent]
Default Job Sheet Status: Default status which will be pre-selected in add job sheet.
Job sheet number prefix: Prefix for Job sheet reference number which will be auto-generated.
Default repair checklist: The Default checklist will be displayed for all devices & device models in add/edit job sheet screen.
Product Configuration, Problem Reported By The Customer, Condition Of The Product: Pre-defined list of product configuration to be used in the add/edit of the job sheet.
Repair terms & conditions: Terms and conditions to be displayed in the job sheet end.
Job Sheet custom fields labels can be changed by going to Repair > Settings > Repair Settings > Label for job sheet custom field
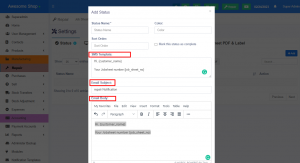
Status can be added/edited from Repair -> Settings -> Status
Status fields:
Status Name: display name for status
Color: Color for identification purposes.
Sort Order: The order in which the status will be displayed.
Mark this status as complete: Any status having this checked will be assumed as completed status. Job sheet or Repair having this status will be assumed as completed.
SMS Template: Template for sending SMS with this particular status
Email Subject, Email Body: Email template for sending for this particular status
Add the devices you repair with the device name and description.
Add all models for each device. By enter model name, selecting brand(optional), selecting device(optional)
Repair Checklist: Add Pipe ( | ) separated checklist which can be used for quickly checking when accepting the device for repair.
The status of job sheets can be checked directly from the login screen without requiring the user to log in. Follow the steps below to use this feature:
Go to the Login Page and click on the Repair Status button.
A popup will appear, where you can enter the Job Sheet Number. Providing the Serial Number is optional.
Click on the Search button to view the job sheet status.